Spring简介
Spring是什么
- Spring是分层的 Java SE/EE应用 full-stack 轻量级开源框架,以 IoC(Inverse Of Control:反转控制)和 AOP(Aspect Oriented Programming:面向切面编程)为内核。
- 提供了展现层 SpringMVC 和持久层 Spring JDBCTemplate 以及业务层事务管理等众多的企业级应用技术,还能整合开源世界众多著名的第三方框架和类库,逐渐成为使用最多的Java EE 企业应用开源框架。
Spring发展历程
Spring的优势
- 方便解耦,简化开发
- 通过 Spring 提供的 IoC容器,可以将对象间的依赖关系交由 Spring 进行控制,避免硬编码所造成的过度耦合。
用户也不必再为单例模式类、属性文件解析等这些很底层的需求编写代码,可以更专注于上层的应用。
- 通过 Spring 提供的 IoC容器,可以将对象间的依赖关系交由 Spring 进行控制,避免硬编码所造成的过度耦合。
- AOP编程的支持
- 通过 Spring的 AOP 功能,方便进行面向切面编程,许多不容易用传统 OOP 实现的功能可以通过 AOP 轻松实现。
- 声明式事务的支持
- 可以将我们从单调烦闷的事务管理代码中解脱出来,通过声明式方式灵活的进行事务管理,提高开发效率和质量。
- 方便程序的测试
- 可以用非容器依赖的编程方式进行几乎所有的测试工作,测试不再是昂贵的操作,而是随手可做的事情。
- 方便集成各种优秀框架
- 方便集成各种优秀框架
- 降低 JavaEE API 的使用难度
- Spring对 JavaEE API(如 JDBC、JavaMail、远程调用等)进行了薄薄的封装层,使这些 API 的使用难度大为降低。
- Java源码是经典学习范例
- Spring的源代码设计精妙、结构清晰、匠心独用,处处体现着大师对Java 设计模式灵活运用以及对 Java技术的高深造诣。它的源代码无意是 Java 技术的最佳实践的范例。
Spring的体系结构
Spring快速入门
Spring程序开发步骤
- 导入Spring开发的基本包坐标
- 编写Dao接口和实现类
- 创建Spring核心配置文件
- 在Spring配置文件中配置 UserDaoImpl
- 使用Spring的API获得Bean实例
导入Spring开发的基本包坐标
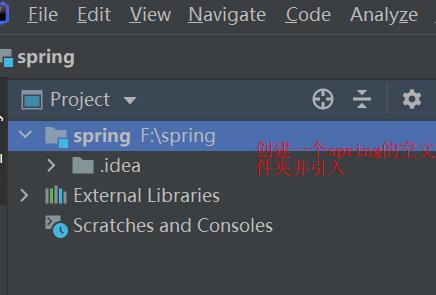
创建一个spring的空项目
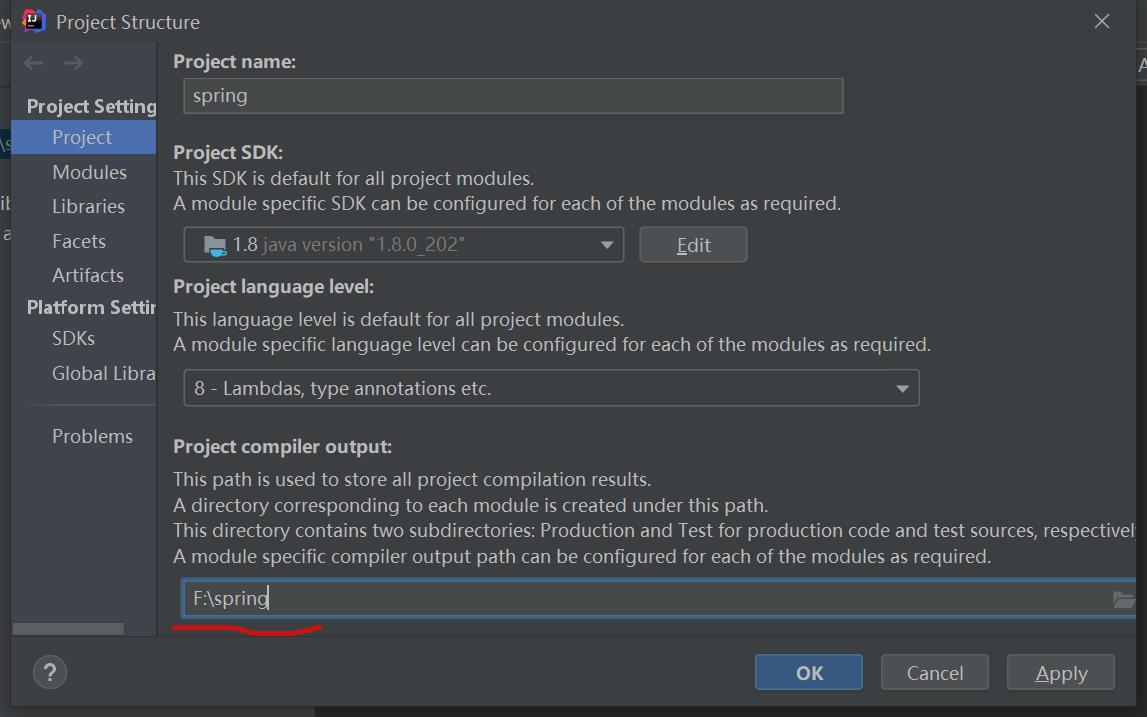
选中spring,点击File => Project Structure,idea中指定他的output
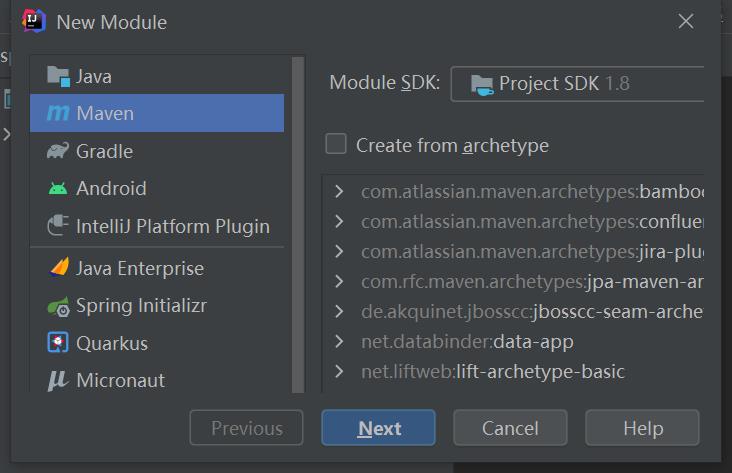
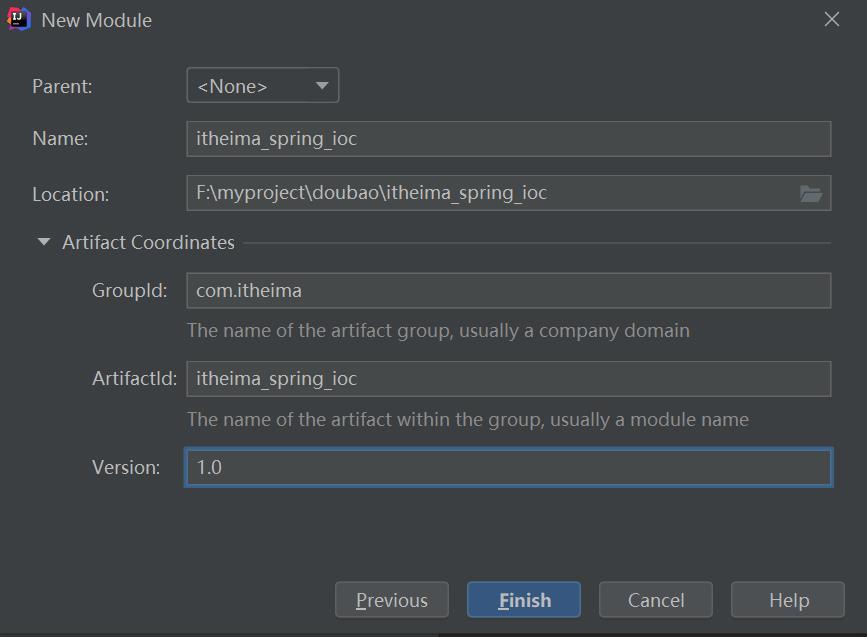
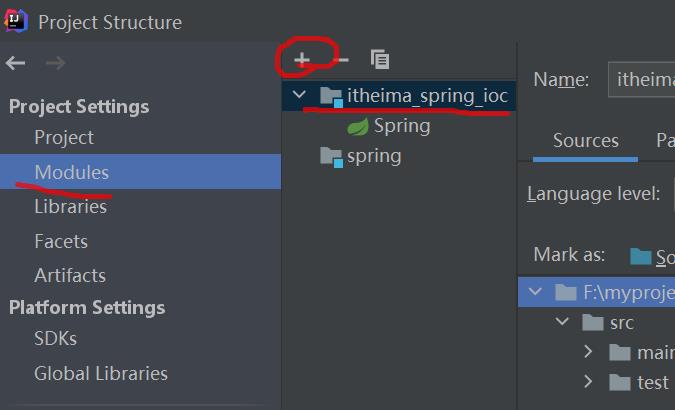
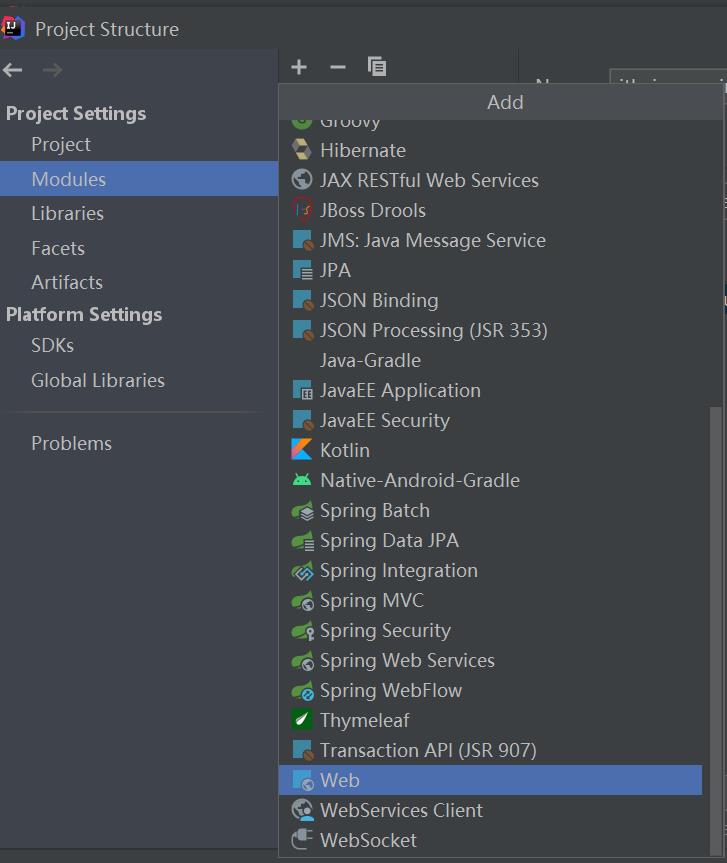
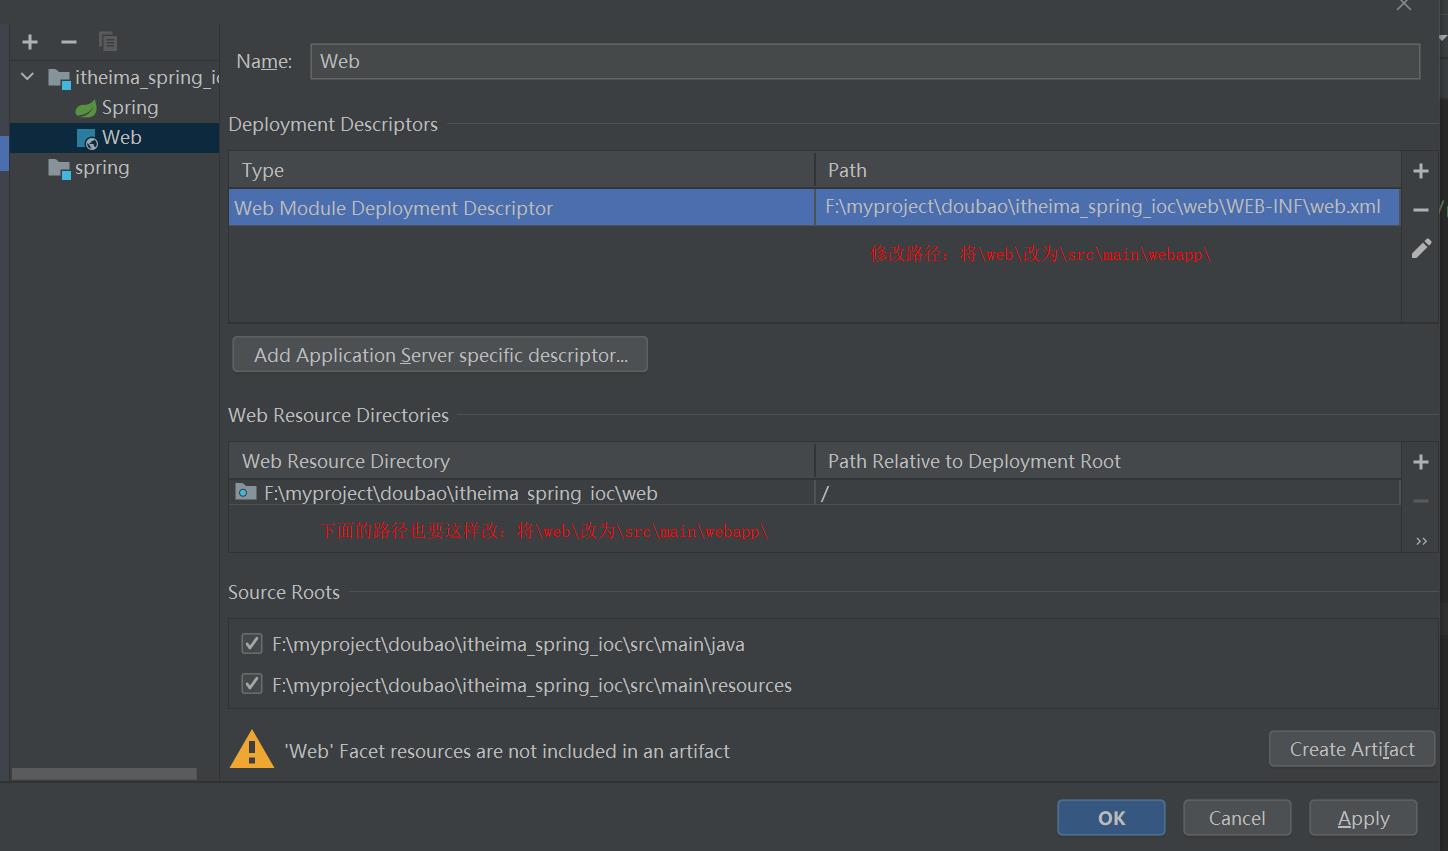
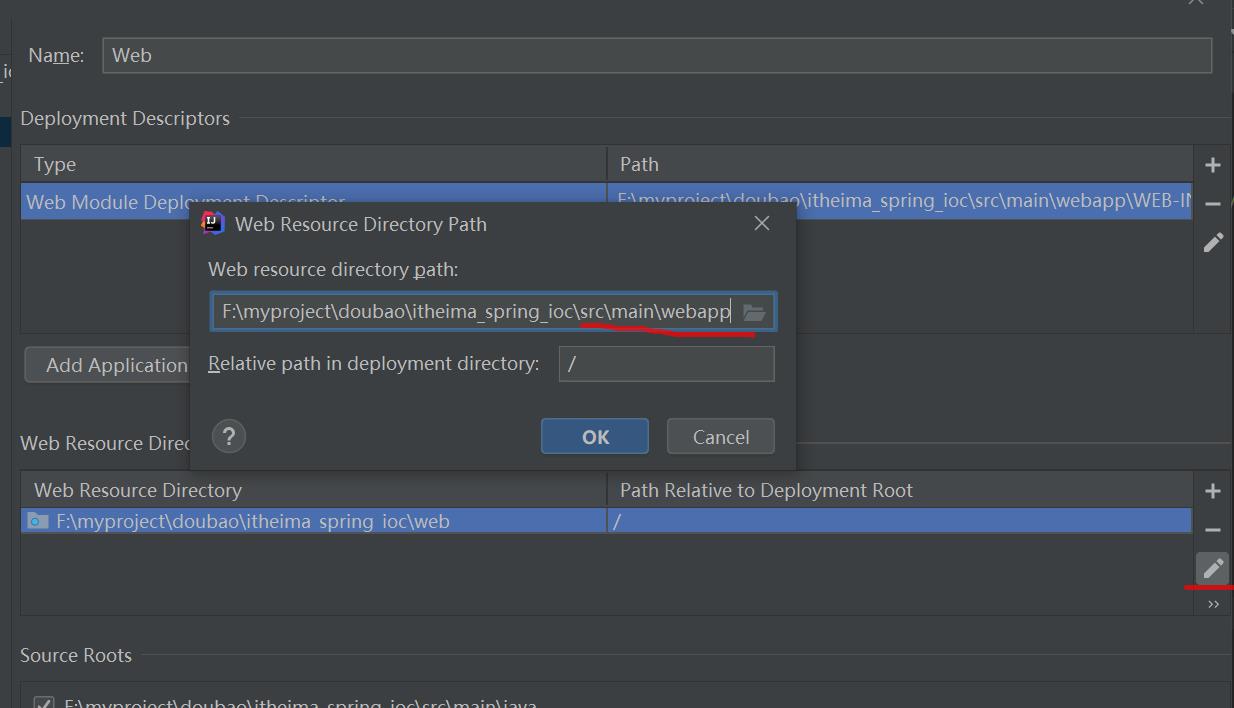
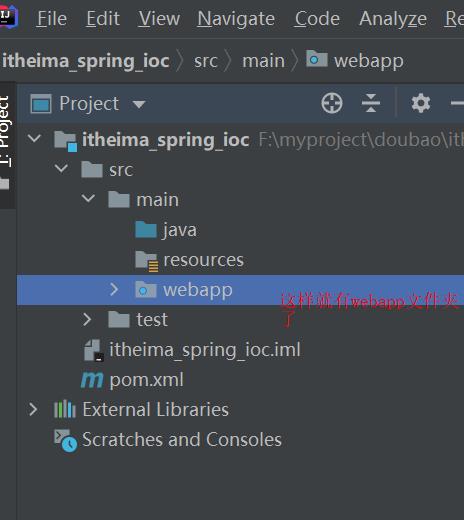
创建一个itheima_spring_ioc的module,点击File => Project Structure,选择modules,在右边选中itheima_spring_ioc,点击+,添加web
在pom.xml中,添加spring-context依赖
<dependencies>
    <dependency>
        <groupId>org.springframework</groupId>
        <artifactId>spring-context</artifactId>
        <version>5.3.7</version>
    </dependency>
</dependencies>
编写Dao接口和实现类
- 在java文件夹下新建com.itheima.dao.UserDao的接口, 并写入一个getInitName方法
package com.itheima.dao;
public interface UserDao {
    public void getInitName();
} - 在java文件夹下新建com.itheima.dao.impl.UserDaoImpl的实现类,去实现UserDao接口的getInitName方法
package com.itheima.dao.impl;
import com.itheima.dao.UserDao;
import java.util.HashMap;
import java.util.Map;
public class UserDaoImpl implements UserDao {
    public void getInitName() {
        Map<String, String> map = new HashMap<String, String>();
        map.put("name", "张三");
        map.put("age", "24");
        for(Map.Entry entry: map.entrySet()) {
            System.out.println("key=" + entry.getKey() + ",value=" + entry.getValue());
        }
    }
}
创建Spring核心配置文件
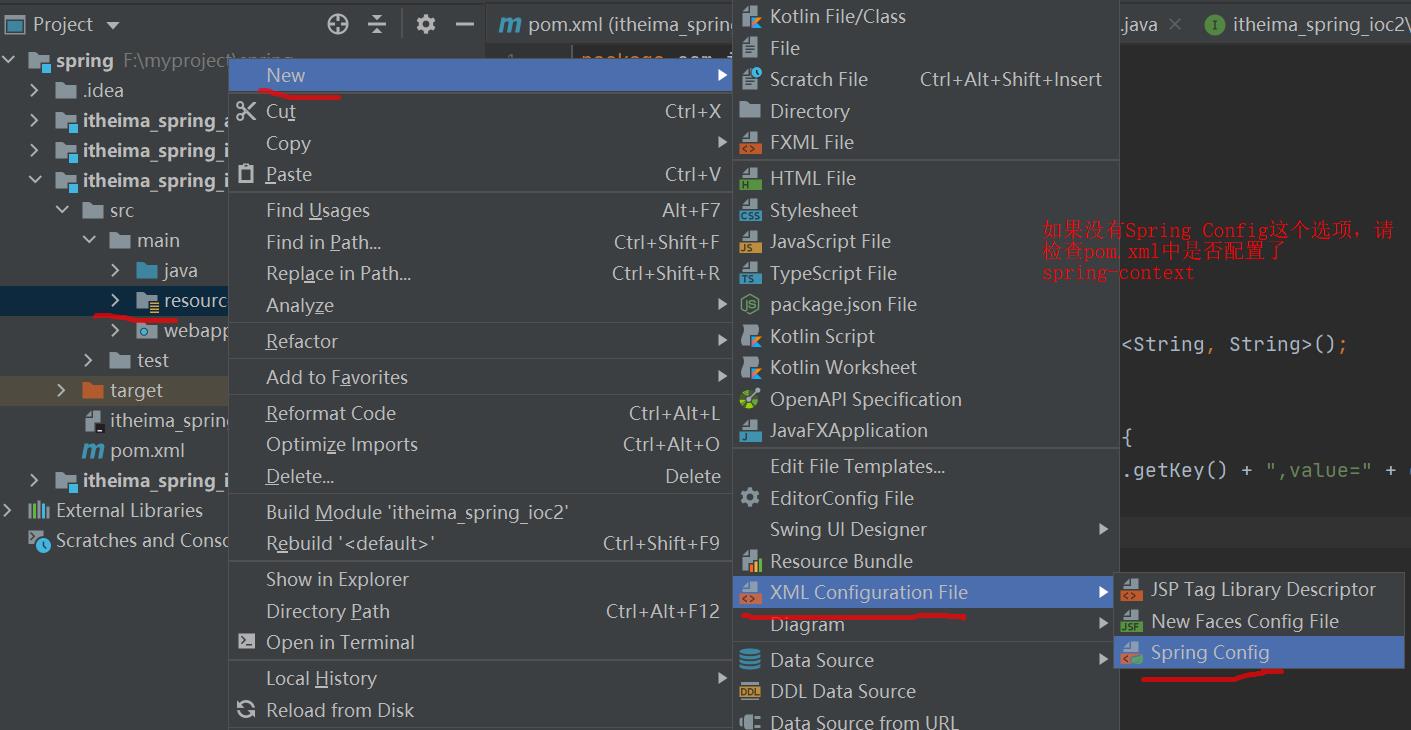
- 在src/main/resources下创建applicationContext.xml

<?xml version="1.0" encoding="UTF-8"?>
<beans xmlns="http://www.springframework.org/schema/beans"
      xmlns:xsi="http://www.w3.org/2001/XMLSchema-instance"
      xsi:schemaLocation="http://www.springframework.org/schema/beans http://www.springframework.org/schema/beans/spring-beans.xsd">
</beans>
在Spring配置文件中配置UserDaoImpl
<?xml version="1.0" encoding="UTF-8"?> |
- 注意:id为唯一值,名字可以随便取。class为UserDaoImpl的文件路径
使用Spring的API获得Bean实例
package com.itheima.demo; |
Spring配置文件
Bean标签基本配置
- 用于配置对象交由Spring 来创建。默认情况下它调用的是类中的无参构造函数,如果没有无参构造函数则不能创建成功。
- 基本属性:
- id:Bean实例在Spring容器中的唯一标识
- class:Bean的全限定名称
Bean标签范围配置
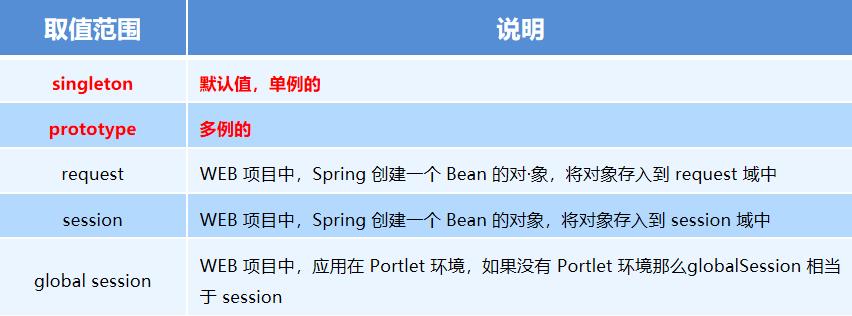
- scope:指对象的作用范围,取值如下:
Bean生命周期配置
- init-method:指定类中的初始化方法名称
- destroy-method:指定类中销毁方法名称
Bean实例化三种方式
无参构造方法实例化
- 它会根据默认无参构造方法来创建类对象,如果bean中没有默认无参构造函数,将会创建失败
<bean id="userDao" class="com.itheima.dao.impl.UserDaoImpl"/>
- 它会根据默认无参构造方法来创建类对象,如果bean中没有默认无参构造函数,将会创建失败
工厂静态方法实例化
- 工厂的静态方法返回Bean实例
public class StaticFactoryBean {
    public static UserDao createUserDao(){
      return new UserDaoImpl();
    }
}

<bean id="userDao" class="com.itheima.factory.StaticFactoryBean" factory-method="createUserDao" />
- 工厂的静态方法返回Bean实例
工厂实例方法实例化
- 工厂的非静态方法返回Bean实例
public class DynamicFactoryBean {
  public UserDao createUserDao(){
    return new UserDaoImpl();
  }
}

<bean id="factoryBean" class="com.itheima.factory.DynamicFactoryBean"/>
<bean id="userDao" factory-bean="factoryBean" factory-method="createUserDao"/>
- 工厂的非静态方法返回Bean实例
Bean的依赖注入概念
依赖注入(Dependency Injection):它是 Spring 框架核心 IOC 的具体实现。
在编写程序时,通过控制反转,把对象的创建交给了 Spring,但是代码中不可能出现没有依赖的情况。
IOC 解耦只是降低他们的依赖关系,但不会消除。例如:业务层仍会调用持久层的方法。
那这种业务层和持久层的依赖关系,在使用 Spring 之后,就让 Spring 来维护了。
简单的说,就是坐等框架把持久层对象传入业务层,而不用我们自己去获取。
Bean的依赖注入方式
构造方法
创建一个新的itheima_spring_04的module,并在java下创建com.itheima.dao.GoodsDao接口
package com.itheima.dao;

public interface GoodsDao {
    public void searchGoodsDetail();
}
在dao下面创建impl.GoodsDaoImpl的实现类,去实现searchGoodsDetail方法
package com.itheima.dao.impl;
import com.itheima.dao.GoodsDao;
import java.util.HashMap;
import java.util.Map;

public class GoodsDaoImpl implements GoodsDao {
    public void searchGoodsDetail() {
        Map map = new HashMap<String, String>();
        map.put("id", "1");
        map.put("goodsName", "小米11");
        map.put("price", "3999");
        System.out.println(map.get("price"));
    }
}
在src/main/resources创建string核心配置文件applicationContext.xml,并配置GoodsDaoImpl
<bean id="goods" class="com.itheima.dao.impl.GoodsDaoImpl" />
在java下创建com.itheima.service.GoodsService的业务层接口
package com.itheima.service;

public interface GoodsService {
    public void getGoodsPrice();
}
在service下,创建impl.GoodsServiceImpl的实现类,去实现业务层getGoodsPrice的方法
package com.itheima.service.impl;
import com.itheima.dao.GoodsDao;
import com.itheima.service.GoodsService;

public class GoodsServiceImpl implements GoodsService {
    private GoodsDao gd;
    public GoodsServiceImpl(GoodsDao gd) {
        this.gd = gd;
    }
    public void getGoodsPrice() {
        gd.searchGoodsDetail();
    }
}
在applicationContext.xml中,将dao层的参数gd注入到GoodsDao的构造函数中
<bean id="goods" class="com.itheima.dao.impl.GoodsDaoImpl" />
<bean id="goodsService" class="com.itheima.service.impl.GoodsServiceImpl">
    <constructor-arg name="gd" ref="goods" />
</bean>
在com.itheima下创建demo.test的类去测试(随便用个文件去测试即可)
package com.itheima.demo;
import com.itheima.service.GoodsService;
import org.springframework.context.ApplicationContext;
import org.springframework.context.support.ClassPathXmlApplicationContext;

public class test {
    public static void main(String[] args) {
        ApplicationContext app = new ClassPathXmlApplicationContext("applicationContext.xml");
        GoodsService gs = (GoodsService) app.getBean("goodsService");
        gs.getGoodsPrice();
    }
}
set方法
创建一个新的itheima_spring_03的module,并在java下创建com.itheima.dao.StudentDao接口
package com.itheima.dao;

public interface StudentDao {
    public void getPont();
}
在dao下面创建impl.StudentDaoImpl的实现类,去实现getPont方法
package com.itheima.dao.impl;
import com.itheima.dao.StudentDao;

public class StudentDaoImpl implements StudentDao {
    public void getPont() {
        System.out.println("您的分数是:68");
    }
}
在src/main/resources创建string核心配置文件applicationContext.xml,并配置StudentDaoImpl
<bean id="studentDao" class="com.itheima.dao.impl.StudentDaoImpl" />
在java下创建com.itheima.service.StudentService的业务层接口
package com.itheima.service;

public interface StudentService {
    public void getMyPoint();
}
在service下,创建impl.StudentServiceImpl的实现类,去实现业务层getMyPoint的方法
package com.itheima.service.impl;
import com.itheima.dao.StudentDao;
import com.itheima.service.StudentService;

public class StudentServiceImpl implements StudentService {
    private StudentDao sd;

    public void setSd(StudentDao sd) {
        this.sd = sd;
    }

    public void getMyPoint() {
        sd.getPont();
    }
}
在applicationContext.xml中,将dao层的StudentDao注入到service层
  <bean id="studentService" class="com.itheima.service.impl.StudentServiceImpl">
    <property name="sd" ref="studentDao" />
</bean>- 注意:property里的name为setSd去掉set的内容,ref关联dao层的StudentDao
在com.itheima下创建demo.StudentDemo的类去测试(随便用个文件去测试即可)
package com.itheima.demo;
import com.itheima.service.StudentService;
import org.springframework.context.ApplicationContext;
import org.springframework.context.support.ClassPathXmlApplicationContext;

public class StudentDemo {
    public static void main(String[] args) {
        ApplicationContext app = new ClassPathXmlApplicationContext("applicationContext.xml");
        StudentService ss = (StudentService) app.getBean("studentService");
        ss.getMyPoint();
    }
}
注意:在applicationContext.xml核心配置文件里,依赖注入可以使用命名空间
# 使用前的写法:

<?xml version="1.0" encoding="UTF-8"?>
<beans xmlns="http://www.springframework.org/schema/beans"
      xmlns:xsi="http://www.w3.org/2001/XMLSchema-instance"
      xsi:schemaLocation="http://www.springframework.org/schema/beans http://www.springframework.org/schema/beans/spring-beans.xsd">

    <bean id="studentDao" class="com.itheima.dao.impl.StudentDaoImpl" />
  <bean id="studentService" class="com.itheima.service.impl.StudentServiceImpl">
    <property name="sd" ref="studentDao" />
  </bean>
</beans>

# 使用后的写法:引入p,然后添加p属性,idea有代码提示

  <?xml version="1.0" encoding="UTF-8"?>
  <beans xmlns="http://www.springframework.org/schema/beans"
        xmlns:p="http://www.springframework.org/schema/p"
        xmlns:xsi="http://www.w3.org/2001/XMLSchema-instance"
        xsi:schemaLocation="http://www.springframework.org/schema/beans http://www.springframework.org/schema/beans/spring-beans.xsd">

      <bean id="studentDao" class="com.itheima.dao.impl.StudentDaoImpl" />
      <bean id="studentService" class="com.itheima.service.impl.StudentServiceImpl" p:sd-ref="studentDao" />
  </beans>
Bean的依赖注入的数据类型
- 注入数据的三种数据类型
- 普通数据类型
- 引用数据类型
- 集合数据类型
普通数据类型
创建一个新的itheima_spring_05的module,并在java下创建com.itheima.dao.StudentDao接口
package com.itheima.dao;

public interface StudentDao {
    public void getInfo();
}
在dao下面创建impl.StudentDaoImpl的实现类,去实现getPont方法
package com.itheima.dao.impl;
import com.itheima.dao.StudentDao;

public class StudentDaoImpl implements StudentDao {
    private String name;
    private int age;
    private int point;
    public void setName(String name) {
        this.name = name;
    }
    public void setAge(int age) {
        this.age = age;
    }
    public void setPoint(int point) {
        this.point = point;
    }
    @Override
    public String toString() {
        return "StudentDaoImpl{" +
                "name='" + name + '\'' +
                ", age=" + age +
                ", point=" + point +
                '}';
    }
    public void getPoint() {
        String res =  this.toString();
        System.out.println(res);
    }
}
在src/main/resources创建string核心配置文件applicationContext.xml,并配置StudentDaoImpl
<bean id="ss" class="com.itheima.dao.impl.StudentDaoImpl">
    <property name="name" value="zhangsan" />
    <property name="age" value="20" />
    <property name="point" value="99" />
</bean>
在java下创建com.itheima.service.StudentService的业务层接口
package com.itheima.service;
public interface StudentService {
    public void getInfo();
}
在service下,创建impl.StudentServiceImpl的实现类,去实现业务层getInfo的方法
package com.itheima.service.impl;
import com.itheima.dao.StudentDao;
import com.itheima.service.StudentService;
public class StudentServiceImpl implements StudentService {
    private StudentDao sd;
    public void setSd(StudentDao sd) {
        this.sd = sd;
    }
    public void getInfo() {
        sd.getPoint();
    }
}
在applicationContext.xml中,将dao层的StudentDao注入到service层
<bean id="ss" class="com.itheima.dao.impl.StudentDaoImpl">
    <property name="name" value="zhangsan" />
    <property name="age" value="20" />
    <property name="point" value="99" />
</bean>
<bean id="studentService" class="com.itheima.service.impl.StudentServiceImpl">
    <property name="sd" ref="ss" />
</bean>- 注意:property里的name为setSd去掉set的内容,ref关联dao层的StudentDao
在com.itheima下创建Test的类去测试(随便用个文件去测试即可)
package com.itheima;
import com.itheima.service.StudentService;
import org.springframework.context.ApplicationContext;
import org.springframework.context.support.ClassPathXmlApplicationContext;

public class Test {
    public static void main(String[] args) {
        ApplicationContext app = new ClassPathXmlApplicationContext("applicationContext.xml");
        StudentService ss = (StudentService) app.getBean("studentService");
        ss.getInfo();
    }
}
引用数据类型
- 参考前面的sptring快速入门
集合数据类型
List<String>的注入(list普通数据)
在上面普通数据类型中的步骤2:
package com.itheima.dao.impl;
import com.itheima.dao.StudentDao;
import java.util.List;
public class StudentDaoImpl implements StudentDao {
    private List<String> strList;
    public void setStrList(List<String> strList) {
        this.strList = strList;
    }
    public void getPoint() {
        System.out.println(strList);
    }
}
步骤3:
<bean id="ss" class="com.itheima.dao.impl.StudentDaoImpl">
    <property name="strList">
        <list>
            <value>小米11</value>
            <value>华为mate60</value>
            <value>魅族17</value>
        </list>
    </property>
</bean>
步骤6:
<bean id="ss" class="com.itheima.dao.impl.StudentDaoImpl">
    <property name="strList">
        <list>
            <value>小米11</value>
            <value>华为mate60</value>
            <value>魅族17</value>
        </list>
    </property>
</bean>
<bean id="studentService" class="com.itheima.service.impl.StudentServiceImpl">
    <property name="sd" ref="ss" />
</bean>
List<Student>的注入(list嵌套map)
- 创建一个新的itheima_spring_07的module,并在java下创建com.itheima.dao.StudentDao接口
package com.itheima.dao;
public interface StudentDao {
    public void searchInfo();
} - 在java下创建com.itheima.common.Student的类
package com.itheima.common;
public class Student {
    private String name;
    private String age;
    public void setName(String name) {
        this.name = name;
    }
    public void setAge(String age) {
        this.age = age;
    }
    @Override
    public String toString() {
        return "Student{" +
                "name='" + name + '\'' +
                ", age='" + age + '\'' +
                '}';
    }
} - 在dao下面创建impl.StudentDaoImpl的实现类,定义一个
List<map>,实现searchInfo方法package com.itheima.dao.impl;
import com.itheima.common.Student;
import com.itheima.dao.StudentDao;
import java.util.List;
public class StudentDaoImpl implements StudentDao {
private List<Student> list;
public void setList(List<Student> list) {
this.list = list;
}
public void searchInfo() {
System.out.println(list.toString());
}
} - 在src/main/resources创建string核心配置文件applicationContext.xml,并配置StudentDaoImpl
<bean id="student" class="com.itheima.common.Student">
    <property name="name" value="张三" />
    <property name="age" value="22" />
</bean>
<bean id="student2" class="com.itheima.common.Student">
    <property name="name" value="王麻子" />
    <property name="age" value="30" />
</bean>
<bean id="studentDaoImpl" class="com.itheima.dao.impl.StudentDaoImpl">
    <property name="list">
        <list>
            <ref bean="student" />
            <ref bean="student2" />
        </list>
    </property>
</bean> - 在java下创建com.itheima.service.StudentService的业务层接口
package com.itheima.service;
public interface StudentService {
    public void getStudentInfo();
} - 在service下,创建impl.StudentServiceImpl的实现类,去实现业务层getStudentInfo的方法
package com.itheima.service.impl;
import com.itheima.dao.StudentDao;
import com.itheima.service.StudentService;
public class StudentServiceImpl implements StudentService {
    private StudentDao sd;
    public void setSd(StudentDao sd) {
        this.sd = sd;
    }
    public void getStudentInfo() {
        sd.searchInfo();
    }
} - 在applicationContext.xml中,将dao层的StudentDao注入到service层
<bean id="studentDaoImpl" class="com.itheima.dao.impl.StudentDaoImpl">
    <property name="list">
        <list>
            <ref bean="student" />
            <ref bean="student2" />
        </list>
    </property>
</bean>
<bean id="studentServiceImpl" class="com.itheima.service.impl.StudentServiceImpl">
    <property name="sd" ref="studentDaoImpl" />
</bean>
- 注意:property里的name为setSd去掉set的内容,ref关联dao层的StudentDao
- 在com.itheima下创建Test的类去测试(随便用个文件去测试即可)
package com.itheima;
import com.itheima.service.StudentService;
import org.springframework.context.ApplicationContext;
import org.springframework.context.support.ClassPathXmlApplicationContext;
public class Test {
    public static void main(String[] args) {
        ApplicationContext app = new ClassPathXmlApplicationContext("applicationContext.xml");
        StudentService ss = (StudentService) app.getBean("studentServiceImpl");
        ss.getStudentInfo();
    }
}
Map<String, String>的注入
- 在上面list嵌套map的注入步骤3,在dao下面创建impl.StudentDaoImpl的实现类,定义一个
map<String, String>,实现searchInfo方法package com.itheima.dao.impl;
import com.itheima.dao.StudentDao;
import java.util.Map;
public class StudentDaoImpl implements StudentDao {
private Map<String, String> map;
public void setMap(Map<String, String> map) {
this.map = map;
}
@Override
public String toString() {
return "StudentDaoImpl{" +
"map=" + map +
'}';
}
public void searchInfo() {
System.out.println(map.toString());
}
} - 步骤4:
<bean id="studentDaoImpl" class="com.itheima.dao.impl.StudentDaoImpl">
    <property name="map">
        <map>
            <entry key="name" value="zhangsan"></entry>
            <entry key="age" value-ref="18"></entry>
        </map>
    </property>
</bean> - 步骤7:
<bean id="studentDaoImpl" class="com.itheima.dao.impl.StudentDaoImpl">
    <property name="map">
        <map>
            <entry key="name" value="zhangsan"></entry>
            <entry key="age" value-ref="18"></entry>
        </map>
    </property>
</bean>
<bean id="studentServiceImpl" class="com.itheima.service.impl.StudentServiceImpl">
    <property name="sd" ref="studentDaoImpl" />
</bean>
Map<String,Student>的注入
- 在上面list嵌套map的注入步骤3,在dao下面创建impl.StudentDaoImpl的实现类,定义一个
map<String, Student>,实现searchInfo方法package com.itheima.dao.impl;
import com.itheima.common.Student;
import com.itheima.dao.StudentDao;
import java.util.Map;
public class StudentDaoImpl implements StudentDao {
private Map<String, Student> map;
public void setMap(Map<String, Student> map) {
this.map = map;
}
@Override
public String toString() {
return "StudentDaoImpl{" +
"map=" + map +
'}';
}
public void searchInfo() {
System.out.println(map.toString());
}
} - 步骤4:
<bean id="student" class="com.itheima.common.Student">
    <property name="name" value="张三" />
    <property name="age" value="22" />
</bean>
<bean id="student2" class="com.itheima.common.Student">
    <property name="name" value="王麻子" />
    <property name="age" value="30" />
</bean>
<bean id="studentDaoImpl" class="com.itheima.dao.impl.StudentDaoImpl">
    <property name="map">
        <map>
            <entry key="s1" value-ref="student"></entry>
            <entry key="s2" value-ref="student2"></entry>
        </map>
    </property>
</bean> - 步骤7:
<bean id="studentDaoImpl" class="com.itheima.dao.impl.StudentDaoImpl">
    <property name="map">
        <map>
            <entry key="s1" value-ref="student"></entry>
            <entry key="s2" value-ref="student2"></entry>
        </map>
    </property>
</bean>
<bean id="studentServiceImpl" class="com.itheima.service.impl.StudentServiceImpl">
    <property name="sd" ref="studentDaoImpl" />
</bean>
Set<String>的注入
- 在上面list嵌套map的注入步骤3,在dao下面创建impl.StudentDaoImpl的实现类,定义一个
Set<String>,实现searchInfo方法package com.itheima.dao.impl;
import com.itheima.dao.StudentDao;
import java.util.Set;
public class StudentDaoImpl implements StudentDao {
private Set<String> setSd;
public void setSetSd(Set<String> setSd) {
this.setSd = setSd;
}
@Override
public String toString() {
return "StudentDaoImpl{" +
"setSd=" + setSd +
'}';
}
public void searchInfo() {
System.out.println(setSd.toString());
System.out.println(setSd.toArray());
}
} - 步骤4:
<bean id="studentDaoImpl" class="com.itheima.dao.impl.StudentDaoImpl">
    <property name="setSd">
        <set>
            <value>123</value>
            <value>456</value>
        </set>
    </property>
</bean> - 步骤7:
<bean id="studentDaoImpl" class="com.itheima.dao.impl.StudentDaoImpl">
    <property name="setSd">
        <set>
            <value>123</value>
            <value>456</value>
        </set>
    </property>
</bean>
<bean id="studentServiceImpl" class="com.itheima.service.impl.StudentServiceImpl">
    <property name="sd" ref="studentDaoImpl" />
</bean>
Properties注入
- 在上面list嵌套map的注入步骤3,在dao下面创建impl.StudentDaoImpl的实现类,定义一个Properties,实现searchInfo方法
package com.itheima.dao.impl;
import com.itheima.dao.StudentDao;
import java.util.Properties;
public class StudentDaoImpl implements StudentDao {
    private Properties properties;
    public void setProperties(Properties properties) {
        this.properties = properties;
    }
    @Override
    public String toString() {
        return "StudentDaoImpl{" +
                "properties=" + properties +
                '}';
    }
    public void searchInfo() {
        System.out.println(properties.toString());
    }
} - 步骤4:
<bean id="studentDaoImpl" class="com.itheima.dao.impl.StudentDaoImpl">
    <property name="properties">
        <props>
            <prop key="key1">aaa</prop>
            <prop key="key2">bbb</prop>
        </props>
    </property>
</bean> - 步骤7:
<bean id="studentDaoImpl" class="com.itheima.dao.impl.StudentDaoImpl">
    <property name="properties">
        <props>
            <prop key="key1">aaa</prop>
            <prop key="key2">bbb</prop>
        </props>
    </property>
</bean>
<bean id="studentServiceImpl" class="com.itheima.service.impl.StudentServiceImpl">
    <property name="sd" ref="studentDaoImpl" />
</bean>
引入其他配置文件(分模块开发)
- 实际开发中,Spring的配置内容非常多,这就导致Spring配置很繁杂且体积很大,所以,可以将部分配置拆解到其他配置文件中,而在Spring主配置文件通过import标签进行加载
<import resource="applicationContext-xxx.xml"/>
总结
<bean>标签 |
Spring配置数据源
数据源(连接池)的作用
- 数据源(连接池)是提高程序性能如出现的
- 事先实例化数据源,初始化部分连接资源
- 使用连接资源时从数据源中获取
- 使用完毕后将连接资源归还给数据源
- 常见的数据源(连接池):DBCP、C3P0、BoneCP、Druid等
数据源的开发步骤
- 导入数据源的坐标和数据库驱动坐标
- 创建数据源对象
- 设置数据源的基本连接数据
- 使用数据源获取连接资源和归还连接资源
c3p0的开发步骤
导入数据源的坐标和数据库驱动坐标
- 导入c3p0的坐标
<dependency>
  <groupId>c3p0</groupId>
  <artifactId>c3p0</artifactId>
  <version>0.9.1.2</version>
</dependency> - 导入mysql数据库驱动坐标
<dependency>
    <groupId>mysql</groupId>
    <artifactId>mysql-connector-java</artifactId>
    <version>5.1.46</version>
</dependency> - 导入测试插件junit
<dependency>
    <groupId>junit</groupId>
    <artifactId>junit</artifactId>
    <version>4.12</version>
</dependency>
完整代码
- 创建一个新的itheima_spring_09的module,并在java下创建com.itheima.test.C3p0Test的测试类
- 编写测试代码
package com.itheima.test;
import com.mchange.v2.c3p0.ComboPooledDataSource;
import org.junit.Test;
import java.sql.Connection;
public class C3p0Test {
    @Test
    public void test1() throws Exception {
        //创建数据源
        ComboPooledDataSource dataSource = new ComboPooledDataSource();
        // 设置数据库参数
        dataSource.setDriverClass("com.mysql.jdbc.Driver");
        dataSource.setJdbcUrl("jdbc:mysql://localhost:3306/test");
        dataSource.setUser("root");
        dataSource.setPassword("root");
        // 获取连接对象
        Connection connection = dataSource.getConnection();
        System.out.println(connection);
        connection.close();
    }
}
druid的开发步骤
导入数据源的坐标和数据库驱动坐标
- 导入druid的坐标
<dependency>
    <groupId>com.alibaba</groupId>
    <artifactId>druid</artifactId>
    <version>1.1.10</version>
</dependency> - 导入mysql数据库驱动坐标
<dependency>
    <groupId>mysql</groupId>
    <artifactId>mysql-connector-java</artifactId>
    <version>5.1.46</version>
</dependency> - 导入测试插件junit
<dependency>
    <groupId>junit</groupId>
    <artifactId>junit</artifactId>
    <version>4.12</version>
</dependency>
完整代码
- 创建一个新的itheima_spring_09的module,并在java下创建com.itheima.test.DruidTest的测试类
- 完整代码
package com.itheima.test;
import com.alibaba.druid.pool.DruidDataSource;
import org.junit.Test;
import java.sql.Connection;
public class DruidTest {
    @Test
    public void test2() throws Exception {
        // 创建数据源
        DruidDataSource dataSource = new DruidDataSource();
        // 设置数据库连接参数
        dataSource.setDriverClassName("com.mysql.jdbc.Driver");
        dataSource.setUrl("jdbc:mysql://localhost:3306/test");
        dataSource.setUsername("root");
        dataSource.setPassword("root");
        // 获取连接对象
        Connection connection = dataSource.getConnection();
        System.out.println(connection);
        connection.close();
    }
}
Spring配置数据源
- 可以将DataSource的创建权交由Spring容器去完成
- DataSource有无参构造方法,而Spring默认就是通过无参构造方法实例化对象的
- DataSource要想使用需要通过set方法设置数据库连接信息,而Spring可以通过set方法进行字符串注入
C3p0的配置参数抽取到resources的jdbc.properties
在resources下新建jdbc.properties,并写入
jdbc.driver=com.mysql.jdbc.Driver
jdbc.url=jdbc:mysql://localhost:3306/test
jdbc.username=root
jdbc.password=root
在com.itheima.test下创建一个C3p0PropertiesTest的类,并写入
package com.itheima.test;
import com.mchange.v2.c3p0.ComboPooledDataSource;
import org.junit.Test;
import java.sql.Connection;
import java.util.ResourceBundle;
public class C3p0PropertiesTest {
    @Test
    // 测试手动创建c3p0数据源(加载properties配置文件)
    public void test3() throws Exception {
        // 读取配置文件
        ResourceBundle rb = ResourceBundle.getBundle("jdbc");
        String driver = rb.getString("jdbc.driver");
        String url = rb.getString("jdbc.url");
        String username = rb.getString("jdbc.username");
        String password = rb.getString("jdbc.password");

        //创建数据源
        ComboPooledDataSource dataSource = new ComboPooledDataSource();
        // 设置数据库参数
        dataSource.setDriverClass(driver);
        dataSource.setJdbcUrl(url);
        dataSource.setUser(username);
        dataSource.setPassword(password);
        // 获取连接对象
        Connection connection = dataSource.getConnection();
        System.out.println(connection);
        connection.close();
    }
}
druid的配置参数抽取到resources的jdbc.properties
在resources下新建jdbc.properties,并写入
jdbc.driver=com.mysql.jdbc.Driver
jdbc.url=jdbc:mysql://localhost:3306/test
jdbc.username=root
jdbc.password=root
在com.itheima.test下创建一个DruidTest的类,并写入
package com.itheima;
import com.alibaba.druid.pool.DruidDataSource;
import org.junit.Test;
import java.sql.Connection;
import java.util.ResourceBundle;

@Test
public void test2() throws Exception {
    ResourceBundle rb = ResourceBundle.getBundle("jdbc");
    String driver = rb.getString("jdbc.driver");
    String url = rb.getString("jdbc.url");
    String user = rb.getString("jdbc.user");
    String password = rb.getString("jdbc.password");

    // 创建数据源
    DruidDataSource dataSource = new DruidDataSource();
    // 设置数据库连接参数
    dataSource.setDriverClassName(driver);
    dataSource.setUrl(url);
    dataSource.setUsername(user);
    dataSource.setPassword(password);
    // 获取连接对象
    Connection connection = dataSource.getConnection();
    System.out.println(connection);
    connection.close();
}
将C3p0的配置参数配置到applicationContext.xml中
在applicationContext.xml中:
<?xml version="1.0" encoding="UTF-8"?>
<beans xmlns="http://www.springframework.org/schema/beans"
      xmlns:xsi="http://www.w3.org/2001/XMLSchema-instance"
      xsi:schemaLocation="http://www.springframework.org/schema/beans http://www.springframework.org/schema/beans/spring-beans.xsd">
<!--c3p0的数据库配置-->
    <bean id="dataSource" class="com.mchange.v2.c3p0.ComboPooledDataSource">
        <property name="driverClass" value="com.mysql.jdbc.Driver"></property>
        <property name="jdbcUrl" value="jdbc:mysql://localhost:3306/test"></property>
        <property name="user" value="root"></property>
        <property name="password" value="root"></property>
    </bean>
</beans>
在java下新建com.itheima.DruidTest类,并写入
package com.itheima;
import org.junit.Test;
import org.springframework.context.ApplicationContext;
import org.springframework.context.support.ClassPathXmlApplicationContext;

import javax.sql.DataSource;
import java.sql.Connection;

@Test
public void test3() throws Exception {
    ApplicationContext app = new ClassPathXmlApplicationContext("ApplicationContext.xml");
    DataSource dataSource = app.getBean(DataSource.class);
    Connection connection = dataSource.getConnection();
    System.out.println(dataSource);
    connection.close();
}
将druid的配置参数配置到applicationContext.xml中
在applicationContext.xml中:
<?xml version="1.0" encoding="UTF-8"?>
<beans xmlns="http://www.springframework.org/schema/beans"
      xmlns:xsi="http://www.w3.org/2001/XMLSchema-instance"
      xsi:schemaLocation="http://www.springframework.org/schema/beans http://www.springframework.org/schema/beans/spring-beans.xsd">
<!--druid数据库配置-->
  <bean id="druidDataSource" class="com.alibaba.druid.pool.DruidDataSource">
      <property name="driverClassName" value="com.mysql.jdbc.Driver"></property>
      <property name="url" value="jdbc:mysql://localhost:3306/test"></property>
      <property name="username" value="root"></property>
      <property name="password" value="root"></property>
  </bean>
</beans>
在java下新建com.itheima.DruidTest类,并写入
package com.itheima;
import org.junit.Test;
import org.springframework.context.ApplicationContext;
import org.springframework.context.support.ClassPathXmlApplicationContext;

import com.alibaba.druid.pool.DruidDataSource;
import java.sql.Connection;

@Test
public void Test3() throws Exception {
    ApplicationContext app = new ClassPathXmlApplicationContext("applicationContext.xml");
    DruidDataSource ds = (DruidDataSource) app.getBean("druidDataSource");
    Connection connection = ds.getConnection();
    System.out.println(connection);
    connection.close();
}
jdbc.properties与xml分开
在jdbc.properties中:
jdbc.driver=com.mysql.jdbc.Driver
jdbc.url=jdbc:mysql://localhost:3306/test
jdbc.user=root
jdbc.password=root
在application.xml中,添加context标签
首先,需要引入context命名空间和约束路径:
- 命名空间:xmlns:context=”http://www.springframework.org/schema/context"
- 约束路径:http://www.springframework.org/schema/context http://www.springframework.org/schema/context/spring-context.xsd
<?xml version="1.0" encoding="UTF-8"?>
<beans xmlns="http://www.springframework.org/schema/beans"
      xmlns:context="http://www.springframework.org/schema/context"
      xmlns:xsi="http://www.w3.org/2001/XMLSchema-instance"
      xsi:schemaLocation="
            http://www.springframework.org/schema/beans http://www.springframework.org/schema/beans/spring-beans.xsd
            http://www.springframework.org/schema/context http://www.springframework.org/schema/context/spring-context.xsd
        ">
        <!--使用context标签-->
    <context:property-placeholder location="classpath:jdbc.properties"></context:property-placeholder>
<!--c3p0的数据库配置-->
    <bean id="dataSource" class="com.mchange.v2.c3p0.ComboPooledDataSource">
        <property name="driverClass" value="${jdbc.driver}"></property>
        <property name="jdbcUrl" value="${jdbc.url}"></property>
        <property name="user" value="${jdbc.user}"></property>
        <property name="password" value="${jdbc.password}"></property>
    </bean>
<!--druid的数据库配置-->
    <bean id="druidDataSource" class="com.alibaba.druid.pool.DruidDataSource">
        <property name="driverClassName" value="${jdbc.driver}"></property>
        <property name="url" value="${jdbc.url}"></property>
        <property name="user" value="${jdbc.user}"></property>
        <property name="password" value="${jdbc.password}"></property>
    </bean>
</beans>
Spring注解开发
Spring原始注解
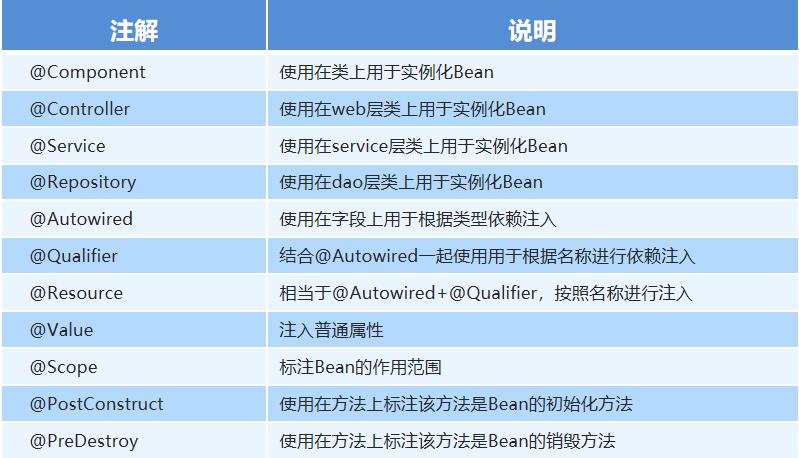
- Spring是轻代码而重配置的框架,配置比较繁重,影响开发效率,所以注解开发是一种趋势,注解代替xml配置文件可以简化配置,提高开发效率。
- Spring原始注解主要是替代
<Bean>的配置 - 注意:使用注解进行开发时,需要在applicationContext.xml中配置组件扫描,作用是指定哪个包及其子包下的Bean需要进行扫描以便识别使用注解配置的类、字段和方法。
<!--注解的组件扫描-->
<context:component-scan base-package="com.itheima"></context:component-scan>
不含注解的代码编写
- 新建一个itheima_spring_ioc10的module,选中并在File=>Project Structure添加webapp文件夹
- 在pom.xml中添加spring-context依赖
<dependency>
    <groupId>org.springframework</groupId>
    <artifactId>spring-context</artifactId>
    <version>5.3.7</version>
</dependency> - 在java下新建com.itheima.dao.UserDao的接口,实现save方法
package com.itheima.dao;
public interface UserDao {
    public void save();
} - 在dao下新建impl.UserDaoImpl的实现类,去实现UserDao的save方法
package com.itheima.dao.impl;
import com.itheima.dao.UserDao;
public class UserDaoImpl implements UserDao {
    public void save() {
        System.out.println("save running...");
    }
} - 在resources下新建applicationContext.xml文件,配置UserDaoImpl
注解代码编写
- 新建一个itheima_spring_di的module,选中并在File=>Project Structure添加webapp文件夹
- 在pom.xml中添加spring-context依赖
<dependency>
    <groupId>org.springframework</groupId>
    <artifactId>spring-context</artifactId>
    <version>5.3.7</version>
</dependency> - 在java下新建com.itheima.dao.UserDao的接口,实现save方法
package com.itheima.dao;
public interface UserDao {
    public void save();
} - 在dao下新建impl.UserDaoImpl的实现类,去实现UserDao的save方法, 并添加@Repository注解
package com.itheima.dao.impl;
import com.itheima.dao.UserDao;
import org.springframework.stereotype.Repository;

//<bean id="userDao" class="com.itheima.dao.impl.UserDaoImpl"></bean>
@Repository("userDao")
public class UserDaoImpl implements UserDao {
    public void save() {
        System.out.println("save running....2");
    }
} - 在java下新建com.itheima.service.UserService的接口
package com.itheima.service;
public interface UserService {
    public void saveResult();
} - 在service下新建impl.UserServiceImpl的实现类,去实现saveResult方法,并添加@Service,@Resource注解
package com.itheima.service.impl;
import com.itheima.dao.UserDao;
import com.itheima.service.UserService;
import org.springframework.stereotype.Service;
import javax.annotation.Resource;

//<bean id="userService" class="com.itheima.service.impl.UserServiceImpl">
@Service("userService")
public class UserServiceImpl implements UserService {
    @Resource(name = "userDao")
    private UserDao ud;
    public void setUd(UserDao ud) {
        this.ud = ud;
    }
    public void saveResult() {
        ud.save();
    }
} - 在applicationContext.xml中将这些注解通知spring,需添加context标签(在beans添加xmlns:context和xsi:schemaLocation)
<?xml version="1.0" encoding="UTF-8"?>
<beans xmlns="http://www.springframework.org/schema/beans"
  xmlns:context="http://www.springframework.org/schema/context"
  xmlns:xsi="http://www.w3.org/2001/XMLSchema-instance"
  xsi:schemaLocation="
  http://www.springframework.org/schema/beans http://www.springframework.org/schema/beans/spring-beans.xsd
  http://www.springframework.org/schema/context http://www.springframework.org/schema/context/spring-context.xsd
">
  <context:component-scan base-package="com.itheima"></context:component-scan>
</beans> - 编写测试类Test
package com.itheima.web;

import com.itheima.service.UserService;
import org.springframework.context.ApplicationContext;
import org.springframework.context.support.ClassPathXmlApplicationContext;

public class Test {
    public static void main(String[] args) {
        ApplicationContext app = new ClassPathXmlApplicationContext("applicationContext.xml");
        UserService us = (UserService) app.getBean("userService");
        us.saveResult();
    }
}
@Component
使用在类上,用于实例化bean
在上面不含注解的代码编写的第四步,添加@Component注解
package com.itheima.dao.impl;
import com.itheima.dao.UserDao;
import org.springframework.stereotype.Component;

//<bean id="userDao" class="com.itheima.dao.impl.UserDaoImpl"></bean>
@Component("userDao")
public class UserDaoImpl implements UserDao {
    public void save() {
        System.out.println("save running....2");
    }
}
步骤5的配置可以删掉
@Service
使用在Service层类上,用于实例化bean
- 在上面不含注解的代码编写的第7步,添加@Service注解
package com.itheima.service.impl;
import com.itheima.dao.UserDao;
import com.itheima.service.UserService;
import org.springframework.stereotype.Service;

//<bean id="userService" class="com.itheima.service.impl.UserServiceImpl">
@Service("userService")
public class UserServiceImpl implements UserService {
    private UserDao ud;

    public void setUd(UserDao ud) {
        this.ud = ud;
    }

    public void saveResult() {
        ud.save();
    }
}
@Repository
使用在dao层类上,用于实例化bean
在上面不含注解的代码编写的第四步,添加@Repository注解
package com.itheima.dao.impl;
import com.itheima.dao.UserDao;
import org.springframework.stereotype.Repository;

//<bean id="userDao" class="com.itheima.dao.impl.UserDaoImpl"></bean>
@Repository("userDao")
public class UserDaoImpl implements UserDao {
    public void save() {
        System.out.println("save running....2");
    }
}
步骤5的配置可以删掉
@Autowired和@Qualifier
@Autowired:用于根据类型依赖注入
@Qualifier:结合@Autowired一起使用,用于根据名称依赖注入
- 在上面不含注解的代码编写的第7步,添加@Autowired、@Qualifier注解
package com.itheima.service.impl;
import com.itheima.dao.UserDao;
import com.itheima.service.UserService;
import org.springframework.beans.factory.annotation.Autowired;
import org.springframework.beans.factory.annotation.Qualifier;
import org.springframework.stereotype.Service;

//<bean id="userService" class="com.itheima.service.impl.UserServiceImpl">
@Service("userService")
public class UserServiceImpl implements UserService {
    @Autowired
    @Qualifier("userDao")
    private UserDao ud;

    public void setUd(UserDao ud) {
        this.ud = ud;
    }

    public void saveResult() {
        ud.save();
    }
}
@Resource
相当于@Autowired+@Qualifier,按照名称进行注入
- 在上面不含注解的代码编写的第7步,添加@Autowired、@Qualifier注解
package com.itheima.service.impl;
import com.itheima.dao.UserDao;
import com.itheima.service.UserService;
import org.springframework.stereotype.Service;
import javax.annotation.Resource;

//<bean id="userService" class="com.itheima.service.impl.UserServiceImpl">
@Service("userService")
public class UserServiceImpl implements UserService {
    @Resource(name = "userDao")
    private UserDao ud;

    public void setUd(UserDao ud) {
        this.ud = ud;
    }

    public void saveResult() {
        ud.save();
    }
}
@Value
注入普通属性
在上面不含注解的代码编写的第四步,添加name和age两个成员变量,使用@Value注解
package com.itheima.dao.impl;
import com.itheima.dao.UserDao;
import org.springframework.beans.factory.annotation.Value;
import org.springframework.stereotype.Repository;

//<bean id="userDao" class="com.itheima.dao.impl.UserDaoImpl"></bean>
@Repository("userDao")
public class UserDaoImpl implements UserDao {
    @Value("历史")
    private String name;
    @Value("18")
    private String age;

    @Override
    public String toString() {
        return "UserDaoImpl{" +
                "name='" + name + '\'' +
                ", age='" + age + '\'' +
                '}';
    }
    public void setName(String name) {
        this.name = name;
    }
    public void setAge(String age) {
        this.age = age;
    }
    public void save() {
        System.out.println(this.toString());
    }
}
步骤5的配置可以删掉
测试代码2:结合druid使用@Value变量
- 新建itheima_spring_di3的module,并配置webapp文件夹
- 在pom.xml添加druid、junit、spring-context、mysql包
<dependency>
    <groupId>org.springframework</groupId>
    <artifactId>spring-context</artifactId>
    <version>5.3.7</version>
</dependency>
<dependency>
    <groupId>junit</groupId>
    <artifactId>junit</artifactId>
    <version>4.12</version>
</dependency>

<dependency>
    <groupId>mysql</groupId>
    <artifactId>mysql-connector-java</artifactId>
    <version>5.1.46</version>
</dependency>

<dependency>
    <groupId>com.alibaba</groupId>
    <artifactId>druid</artifactId>
    <version>1.1.10</version>
</dependency> - 在resources下新建jdbc.properties
jdbc.driver=com.mysql.jdbc.Driver
jdbc.url=jdbc:mysql://localhost:3306/test
jdbc.username=root
jdbc.password=root - 在resources下新建applicationContext.xml,并引入jdbc.properties
<?xml version="1.0" encoding="UTF-8"?>
<beans xmlns="http://www.springframework.org/schema/beans"
      xmlns:xsi="http://www.w3.org/2001/XMLSchema-instance"
      xmlns:context="http://www.springframework.org/schema/context"
      xsi:schemaLocation="
      http://www.springframework.org/schema/beans http://www.springframework.org/schema/beans/spring-beans.xsd
      http://www.springframework.org/schema/context http://www.springframework.org/schema/context/spring-context.xsd
">
    <context:component-scan base-package="com.itheima"></context:component-scan>
    <context:property-placeholder location="jdbc.properties"></context:property-placeholder>
    <bean id="druidDataSource" class="com.alibaba.druid.pool.DruidDataSource">
        <property name="driverClassName" value="${jdbc.driver}"></property>
        <property name="url" value="${jdbc.url}"></property>
        <property name="username" value="${jdbc.username}"></property>
        <property name="password" value="${jdbc.password}"></property>
    </bean>
</beans> - 在java下新建com.itheima.dao.StudentDao
package com.itheima.dao;
public interface StudentDao {
    public void getPoint();
} - 在dao下新建impl.StudentDaoImpl的实现类,使用@Repository、@Value注解
package com.itheima.dao.impl;
import com.itheima.dao.StudentDao;
import org.springframework.beans.factory.annotation.Value;
import org.springframework.stereotype.Repository;

@Repository("student")
public class StudentDaoImpl implements StudentDao {
    @Value("张三") // 注入普通数据
    private String name;
    @Value("20")
    private String age;
    @Value("${jdbc.driver}") // 注入jdbc.properties的值
    private String driver;
    public void setDriver(String driver) {
        this.driver = driver;
    }
    public void setName(String name) {
        this.name = name;
    }
    public void setAge(String age) {
        this.age = age;
    }
    @Override
    public String toString() {
        return "StudentDaoImpl{" +
                "name='" + name + '\'' +
                ", age='" + age + '\'' +
                ", driver='" + driver + '\'' +
                '}';
    }
    public void getPoint() {
        String res = this.toString();
        System.out.println(res);
    }
} - 在java下新建com.itheima.service.StudentService的业务层
package com.itheima.service;
public interface StudentService {
    public void searchInfo();
} - 在service下新建StudentServiceImpl的实现类,使用@Service和@Resource注解
package com.itheima.service.impl;
import com.itheima.dao.StudentDao;
import com.itheima.service.StudentService;
import org.springframework.stereotype.Service;
import javax.annotation.Resource;

@Service("studentService")
public class StudentServiceImpl implements StudentService {
    @Resource(name = "student")
    private StudentDao sd;
    public void setSd(StudentDao sd) {
        this.sd = sd;
    }
    public void searchInfo() {
        sd.getPoint();
    }
} - 编写测试方法
package com.itheima;
import com.itheima.service.StudentService;
import org.springframework.context.ApplicationContext;
import org.springframework.context.support.ClassPathXmlApplicationContext;

public class Test {
    @org.junit.Test
    public void test1() {
        ApplicationContext app = new ClassPathXmlApplicationContext("applicationContext.xml");
        StudentService ss = (StudentService) app.getBean("studentService");
        ss.searchInfo();
    }
}
Spring新注解
- 使用上面的注解还不能全部替代xml配置文件,还需要使用注解替代的配置如下:
- 非自定义的Bean的配置:
<bean> - 加载properties文件的配置:
<context:property-placeholder> - 组件扫描的配置:
<context:component-scan> - 引入其他文件:
<import>
- 非自定义的Bean的配置:
不含新注解的代码编写
- 新建itheima_spring_di4的module,并配置webapp文件夹
- 在pom.xml中引入spring-context、mysql-connector-java、druid包
<dependency>
    <groupId>org.springframework</groupId>
    <artifactId>spring-context</artifactId>
    <version>5.3.7</version>
</dependency>
<dependency>
    <groupId>com.alibaba</groupId>
    <artifactId>druid</artifactId>
    <version>1.1.10</version>
</dependency>
<dependency>
    <groupId>mysql</groupId>
    <artifactId>mysql-connector-java</artifactId>
    <version>5.1.46</version>
</dependency> - 在resources下新建jdbc.properties文件夹
jdbc.driver=com.mysql.jdbc.Driver
jdbc.url=jdbc:mysql://localhost:3306/test
jdbc.username=root
jdbc.password=root - 在resources下新建applicationContext.xml,引入jdbc.properties
<?xml version="1.0" encoding="UTF-8"?>
<beans xmlns="http://www.springframework.org/schema/beans"
      xmlns:context="http://www.springframework.org/schema/context"
      xmlns:xsi="http://www.w3.org/2001/XMLSchema-instance"
      xsi:schemaLocation="
      http://www.springframework.org/schema/beans http://www.springframework.org/schema/beans/spring-beans.xsd
      http://www.springframework.org/schema/context http://www.springframework.org/schema/context/spring-context.xsd
">
<!--引入jdbc.properties-->
    <context:property-placeholder location="jdbc.properties"></context:property-placeholder>
    <bean id="druidDataSource" class="com.alibaba.druid.pool.DruidDataSource">
        <property name="driverClassName" value="${jdbc.driver}"></property>
        <property name="url" value="${jdbc.url}"></property>
        <property name="username" value="${jdbc.username}"></property>
        <property name="password" value="${jdbc.password}"></property>
    </bean>
</beans> - 在java下新建com.itheima.dao.StudentDao
package com.itheima.dao;
public interface StudentDao {
    public void searchPoint();
} - 在dao下新建impl.StudentDaoImpl类,并使用@Repository、@Value注解
package com.itheima.dao.impl;
import com.itheima.dao.StudentDao;
import org.springframework.beans.factory.annotation.Value;
import org.springframework.stereotype.Repository;

@Repository("studentDao")
public class StudentDaoImpl implements StudentDao {
    @Value("张三")
    private String name;
    @Value("18")
    private String age;
    @Value("99")
    private int point;
    @Value("${jdbc.driver}")
    private String driver;
    public void setName(String name) {
        this.name = name;
    }
    public void setAge(String age) {
        this.age = age;
    }
    public void setPoint(int point) {
        this.point = point;
    }
    public void setDriver(String driver) {
        this.driver = driver;
    }

    @Override
    public String toString() {
        return "StudentDaoImpl{" +
                "name='" + name + '\'' +
                ", age='" + age + '\'' +
                ", point=" + point +
                ", driver='" + driver + '\'' +
                '}';
    }
    public void searchPoint() {
        System.out.println(this.toString());
    }
} - 在java下新建com.itheima.service.StudentService的业务层
package com.itheima.service.impl;
import com.itheima.dao.StudentDao;
import com.itheima.service.StudentService;
import org.springframework.stereotype.Service;
import javax.annotation.Resource;

@Service("studentService")
public class StudentServiceImpl implements StudentService {
    @Resource(name = "studentDao")
    private StudentDao sd;
    public void setSd(StudentDao sd) {
        this.sd = sd;
    }
    public void getPoint() {
        sd.searchPoint();
    }
} - 在applicationContext.xml中添加扫描注解
<!--配置文件扫描,扫描com.itheima包-->
<context:component-scan base-package="com.itheima"></context:component-scan> - 编写测试方法
package com.itheima;

import com.itheima.service.StudentService;
import org.springframework.context.ApplicationContext;
import org.springframework.context.support.ClassPathXmlApplicationContext;
public class Test {
    public static void main(String[] args) {
        ApplicationContext app = new ClassPathXmlApplicationContext("applicationContext.xml");
        StudentService ss = (StudentService) app.getBean("studentService");
        ss.getPoint();
    }
}
使用新注解代码编写
在前面不含新注解的代码第5步前,在java下新建com.itheima.Config.SpringConfig配置类,并写入
package com.itheima.config;

import com.alibaba.druid.pool.DruidDataSource;
import org.springframework.beans.factory.annotation.Value;
import org.springframework.context.annotation.Bean;
import org.springframework.context.annotation.ComponentScan;
import org.springframework.context.annotation.Configuration;
import org.springframework.context.annotation.PropertySource;

import javax.sql.DataSource;

// 标志该类是Spring的核心配置类
@Configuration
//    <context:component-scan base-package="com.itheima"></context:component-scan>
@ComponentScan("com.itheima")
//    <context:property-placeholder location="jdbc.properties"></context:property-placeholder>
@PropertySource("classpath:jdbc.properties")
public class SpringConfig {
    @Value("${jdbc.driver}")
    private String driver;
    @Value("${jdbc.url}")
    private String url;
    @Value("${jdbc.username}")
    private String username;
    @Value("${jdbc.password}")
    private String password;

    @Bean("druidDataSource") // Spring会将当前方法的返回值以指定名称存储到Spring容器中
    /*
    该注解代替:
    <bean id="druidDataSource" class="com.alibaba.druid.pool.DruidDataSource">
        <property name="driverClassName" value="${jdbc.driver}"></property>
        <property name="url" value="${jdbc.url}"></property>
        <property name="username" value="${jdbc.username}"></property>
        <property name="password" value="${jdbc.password}"></property>
    </bean>
    */
    public DataSource getDataSource() {
        DruidDataSource ds = new DruidDataSource();
        ds.setDriverClassName(driver);
        ds.setUrl(url);
        ds.setUsername(username);
        ds.setPassword(password);
        return ds;
    }
}
applicationContext.xml就完全没有用了
编写测试方法
package com.itheima;
import com.itheima.config.SpringConfig;
import com.itheima.service.StudentService;
import org.springframework.context.ApplicationContext;
import org.springframework.context.annotation.AnnotationConfigApplicationContext;

public class Test {
    public static void main(String[] args) {
        ApplicationContext app = new AnnotationConfigApplicationContext(SpringConfig.class);
        StudentService ss = (StudentService) app.getBean("studentService");
        ss.getPoint();
    }
}
@Configuration
用于指定当前类是一个 Spring 配置类,当创建容器时会从该类上加载注解
- 在上面添加新注解的代码中,@Configuration注解,相当于告诉spring这是核心配置类
@ComponentScan
用于指定 Spring 在初始化容器时要扫描的包。作用和在 Spring 的 xml 配置文件中的<context:component-scan base-package="com.itheima"/>一样
- 在上面添加新注解的代码中,@ComponentScan注解,替换了applicationContext.xml中的
<context:component-scan base-package="com.itheima"/>
@PropertySource
用于加载.properties 文件中的配置
- 在上面添加新注解的代码中,@PropertySource注解,替换了applicationContext.xml中的
<context:property-placeholder location="jdbc.properties"></context:property-placeholder>
@Bean
使用在方法上,标注将该方法的返回值存储到 Spring 容器中
- 在上面添加新注解的代码中,@Bean注解,加上一个随便定义的getDataSource函数,替换了applicationContext.xml中的
<bean id="druidDataSource" class="com.alibaba.druid.pool.DruidDataSource">
    <property name="driverClassName" value="${jdbc.driver}"></property>
    <property name="url" value="${jdbc.url}"></property>
    <property name="username" value="${jdbc.username}"></property>
    <property name="password" value="${jdbc.password}"></property>
</bean>
@Import
用于导入其他配置类
在上面添加新注解的代码中,SpringConfig中的配置很多的时候,可以进行拆分,在java下新建com.itheima.Config.DataSourceConfig的配置类,把所有跟操作数据库相关的配置放到里面
package com.itheima.config;
import com.alibaba.druid.pool.DruidDataSource;
import org.springframework.beans.factory.annotation.Value;
import org.springframework.context.annotation.Bean;
import org.springframework.context.annotation.PropertySource;
import javax.sql.DataSource;

//    <context:property-placeholder location="jdbc.properties"></context:property-placeholder>
@PropertySource("classpath:jdbc.properties")

public class DataSourceConfig {
    @Value("${jdbc.driver}")
    private String driver;
    @Value("${jdbc.url}")
    private String url;
    @Value("${jdbc.username}")
    private String username;
    @Value("${jdbc.password}")
    private String password;

    @Bean("druidDataSource") // Spring会将当前方法的返回值以指定名称存储到Spring容器中
    public DataSource getDataSource() {
        DruidDataSource ds = new DruidDataSource();
        ds.setDriverClassName(driver);
        ds.setUrl(url);
        ds.setUsername(username);
        ds.setPassword(password);
        return ds;
    }
}
在SpringConfig配置类中使用@Import引入
package com.itheima.config;
import org.springframework.context.annotation.*;

@Configuration
@ComponentScan("com.itheima")
@Import({ DataSourceConfig.class })
public class SpringConfig {
}

